Presentation Pointer

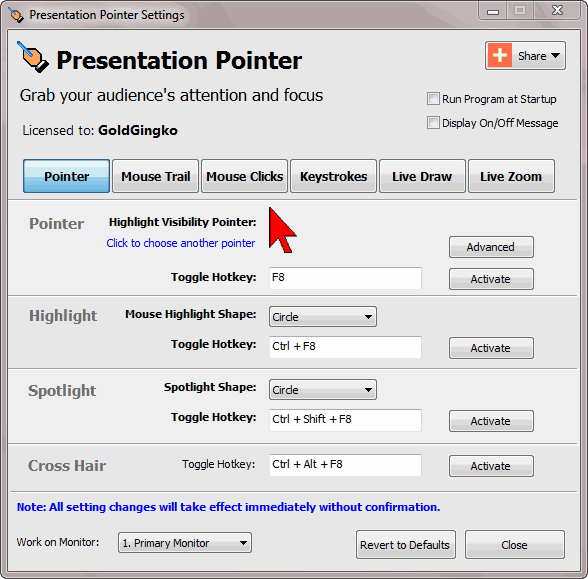
Launch Presentation Pointer and you will see the Settings Window opened.


Now you are ready to use Presentation Pointer. Just press the pre-defined hotkey (F8 by default) and you should see the Pointer being activated. Alternatively you can also activate the effect or access the settings through the Presentation Pointer menu by right click the icon screencasting software in system tray.

The Mouse Clicks and Keystrokes and Live Draw function can be operated in two different modes: Standalone or together with the Pointer effect. The first mode means, you can make that effects independently controllably. The latter mode means the effect will automatically be toggled whenever the Pointer effect is toggled.

Switch on the effect when giving a demo in front of an audience or even in a 1:1 situation, and your audience will be able to follow you much easier.

Everything about Presentation Pointer is customizable: you can change all the hotkeys and adjust options to control appearance and behaviors of Presentation Pointer’s effects.  


Presentation Pointer Step by Step Tutorials

Title Category Format
01: Getting Started Getting Started Series Written
02: Highlight mouse pointer cursor during presentations Presenting Series Written
03: Mouse Clicks Visible Effect Presenting Series Written
04: Display Keystrokes to Make It More Understandable for Tutorials Presenting Series Written
05: Using the on-screen pen to draw on video & live screen Presenting Series Written
06: Live zoom in computer screen on Windows Presenting Series Written
07: Demo of Presentation Pointer Presenting Series Video
Presentation Pointer Documentation Reference PDF


Free Download Presentation Pointer
 
Buy Now
Only $29.95
Money Back Guarantee


Unlike Microsoft Sysinternals ZoomIt, it can draw on a “live” screen. It has many features and options. ...


Home |  About Us  |  Contact Us   |   Subscribe Newsletter   |   Links   |   Sitemap
©2008-2023 Presentation-Assistant.com.